Click here to go to our “Get started page”
Setup Tutorials
Learn how to set up WeVPN on various platforms
-
macOS Setup
-
iOS Setup
-
Windows Setup
-
Android Setup
Download the WeVPN App
Contents
-
01.
Download the WeVPN App
-
02.
Setup the WeVPN App
-
03.
Connect to one of our 66 VPN server locations
-
04.
How to connect to a different VPN server location
-
05.
Disconnect from the VPN
-
06.
Auto Connect Feature
-
07.
How to change your DNS servers on macOS
-
08.
How to use WeBlock
-
09.
Help Center or Contact Support in the app
-
10.
How to remove the WeVPN app from your Mac device
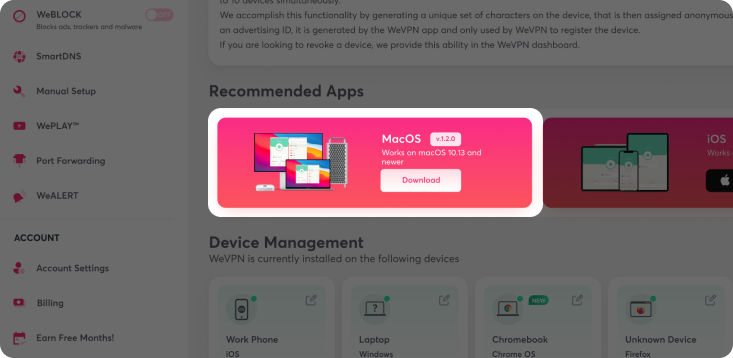
How to set up WeVPN on macOS
This tutorial will show you how to download and install WeVPN on your macOS device.
This App requires the following macOS System:
-
macOS X 10.10 (Yosemite)
-
macOS 10.12 (Sierra)
-
macOS 10.11 (El Capitan)
-
macOS 10.13 (High Sierra)
-
macOS 10.14 (Mojave)
-
macOS 10.15 (Catalina)
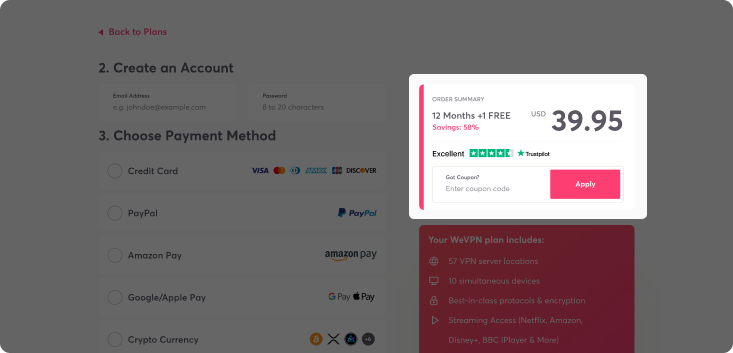
Step 01
Download the WeVPN App
-
1
-
2
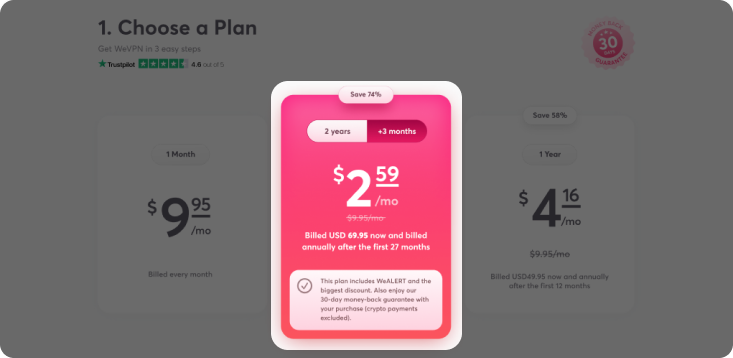
Select a plan. WeVPN offers a 30-day money-guarantee.

-
3
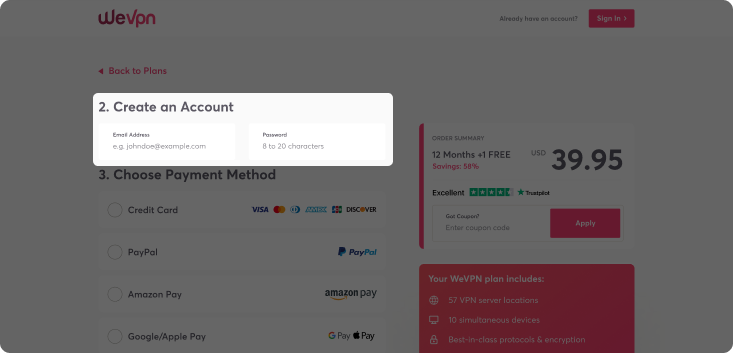
Enter a valid email and create a strong password.
-
4
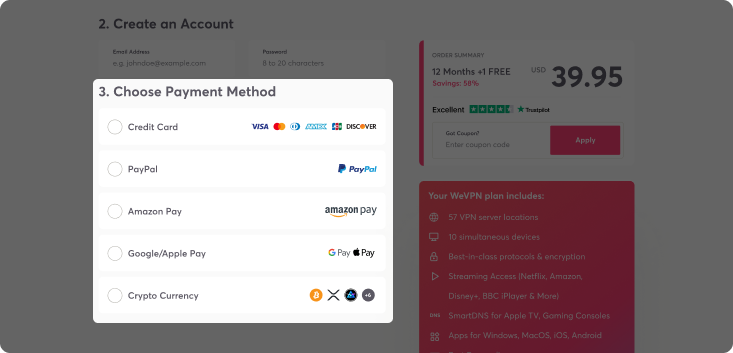
Select a payment method and fill out your billing and contact information.
-
5
if you have, enter the coupon code then click the apply button
-
6
Next, you will be redirected to your dashboard.
-
7
Click the ‘Download’ button. The download will start automatically.
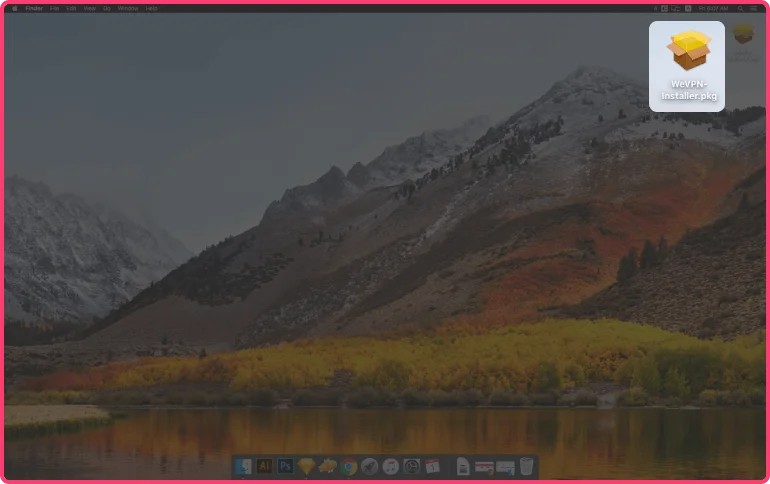
Step 02
Setup the WeVPN App
-
1
Go to your Downloads folder. Locate and double-click the WeVPN installer file.
-
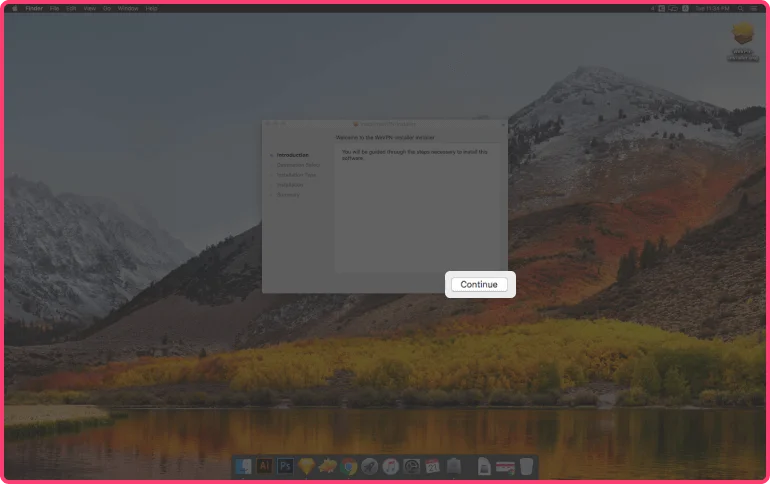
2
A window will popup. Click Continue until you reach the ‘Installation type’ screen.
-
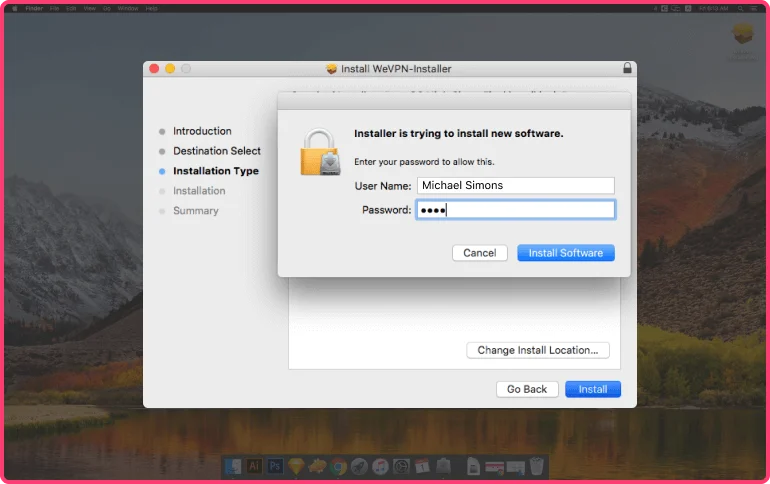
3
Click Install and enter your device password or touch ID.
-
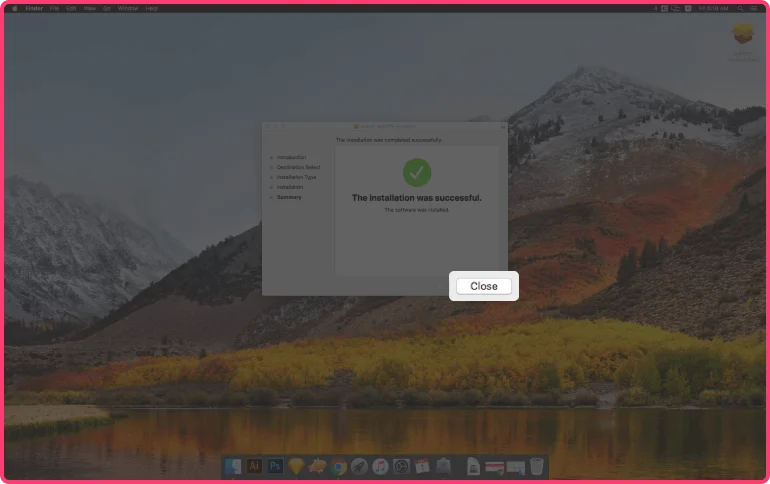
4
Please wait while the app is being installed. Then click Close.
-
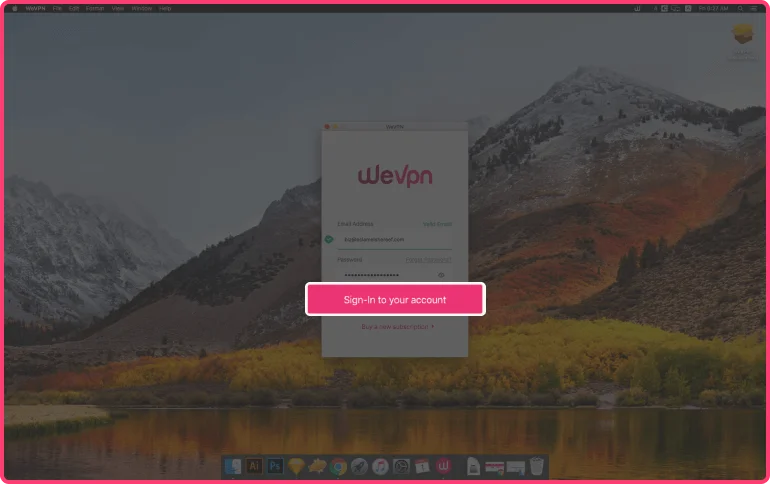
5
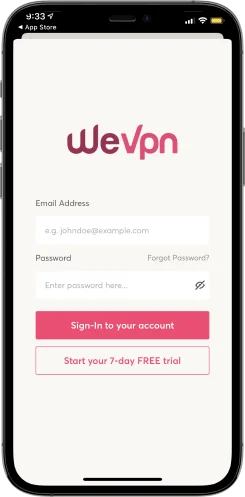
Open the WeVPN app and use the credentials you created earlier.
Then click Sign-in to your account.
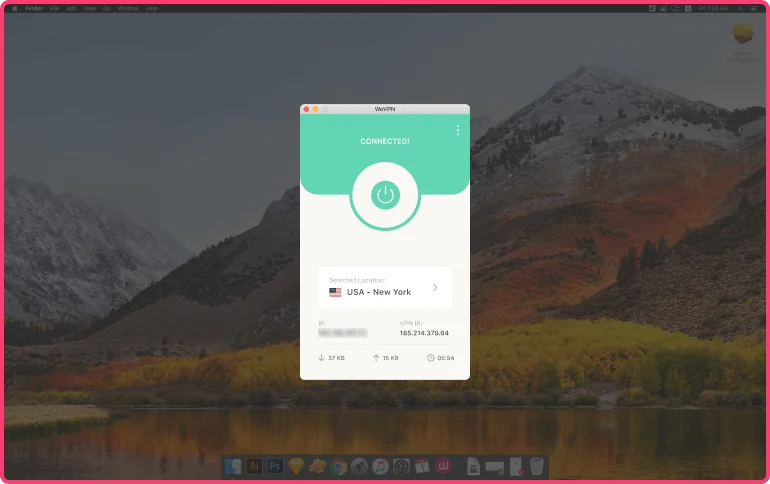
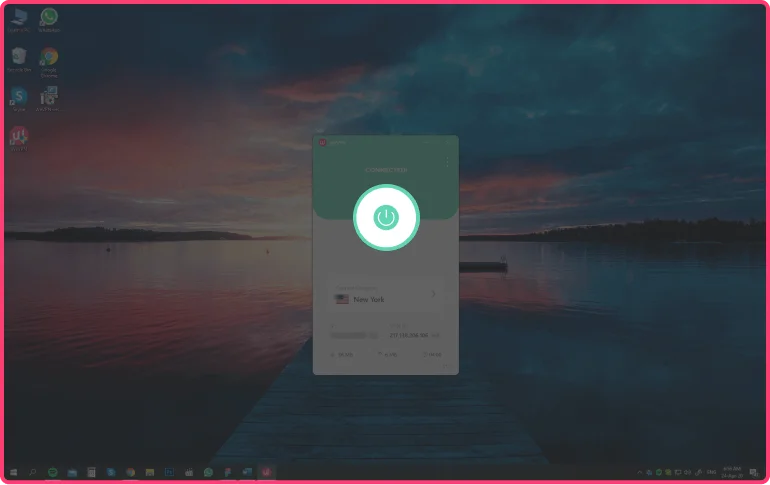
Step 03
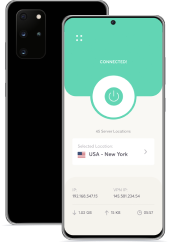
Connect to one of our VPN server locations
-
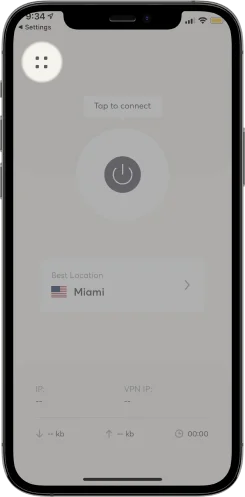
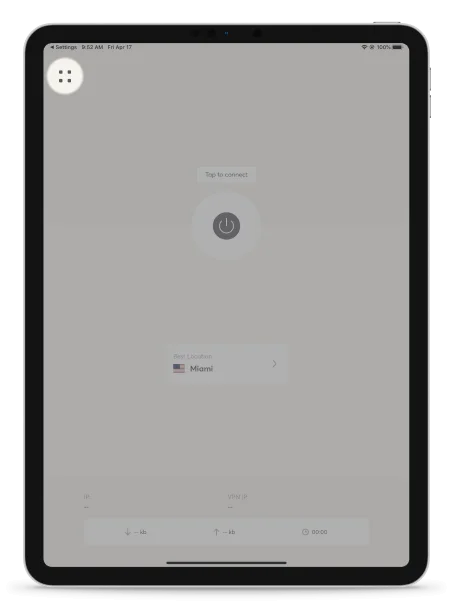
1
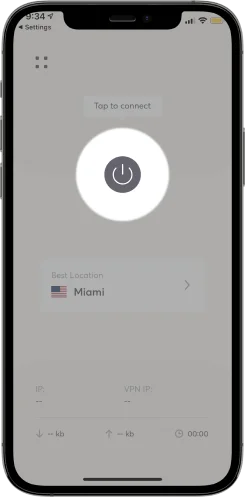
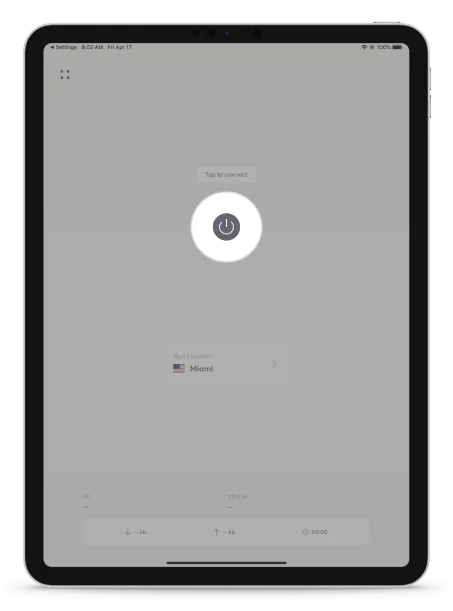
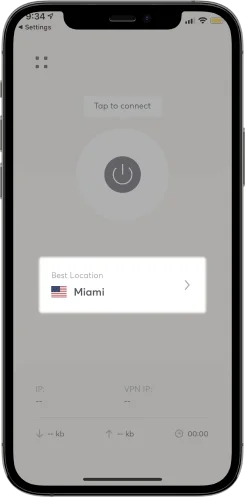
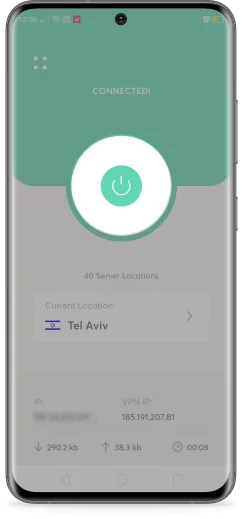
To automatically connect to a VPN server location, click the ON button. By default, our smart algorithm will connect you to the optimal server (based on your location, needs and preferences).
-
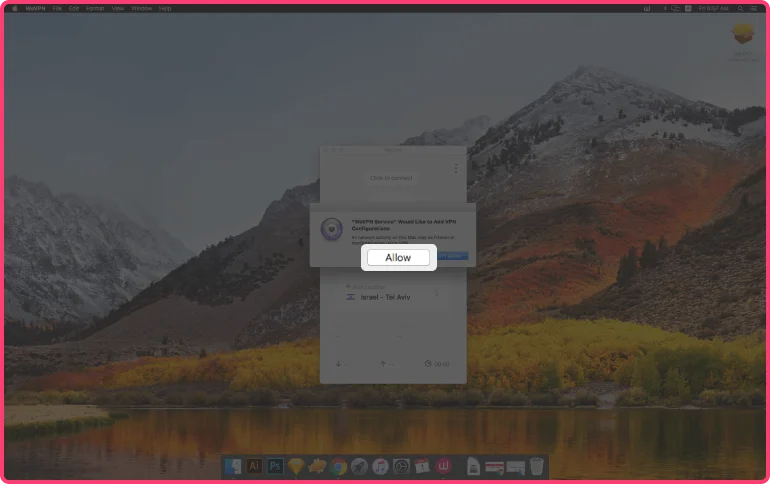
2
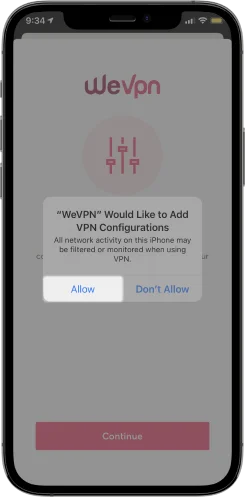
The app will ask you to Add a VPN configuration. Click Allow and when prompted, enter your Administrator’s password. Then click Allow.
-
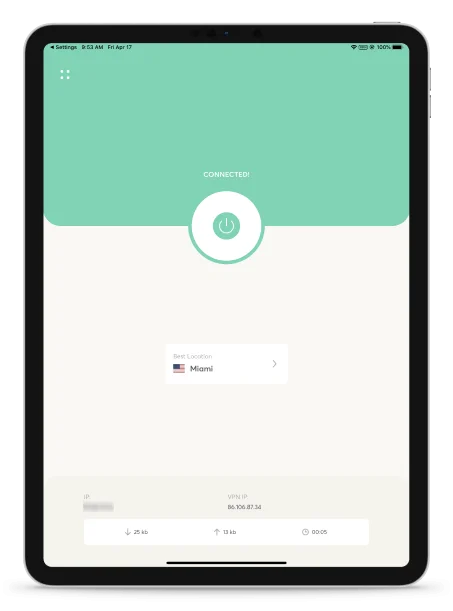
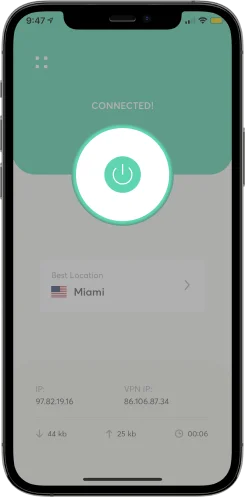
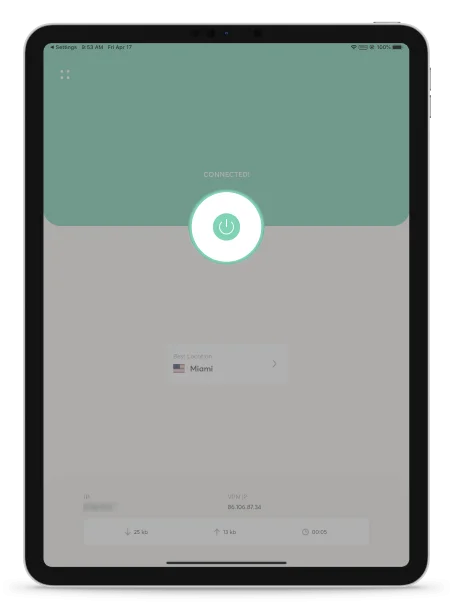
3
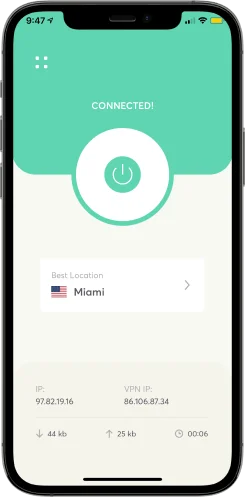
Once the app is connected, you can start enjoying a fast, secure & unrestricted internet connection!

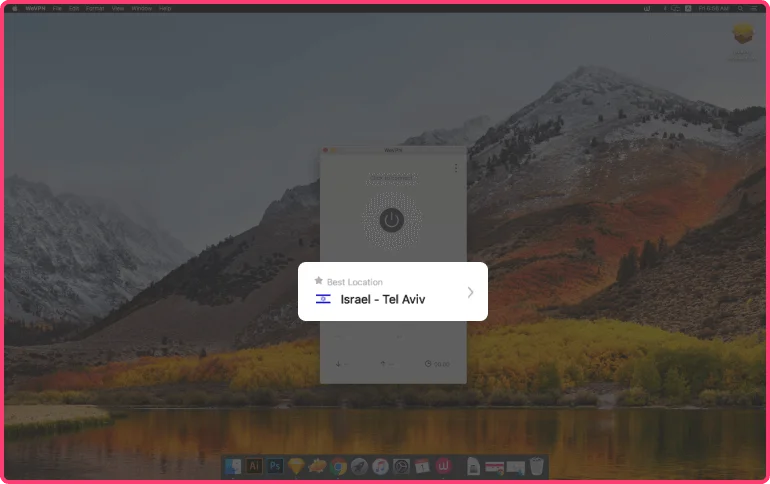
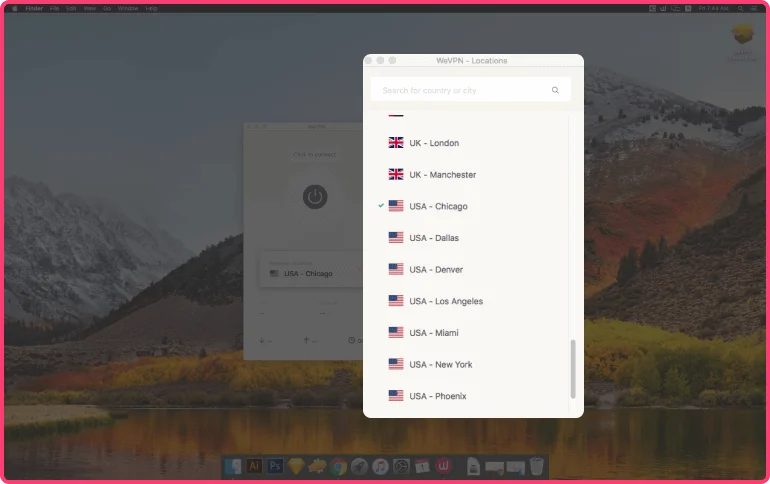
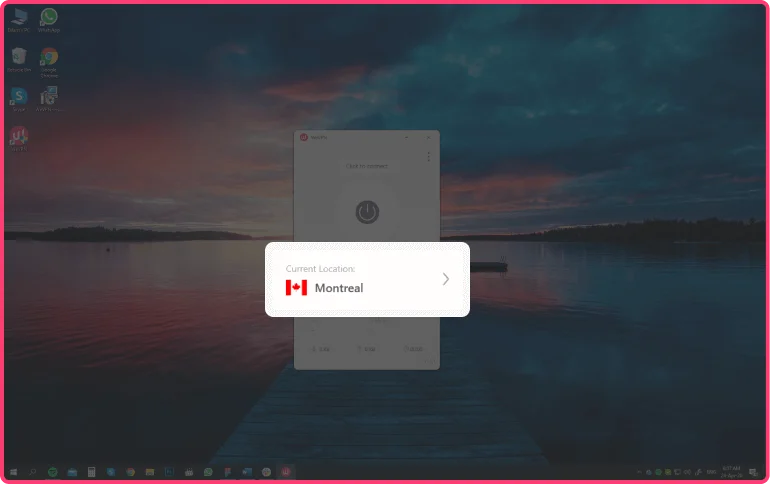
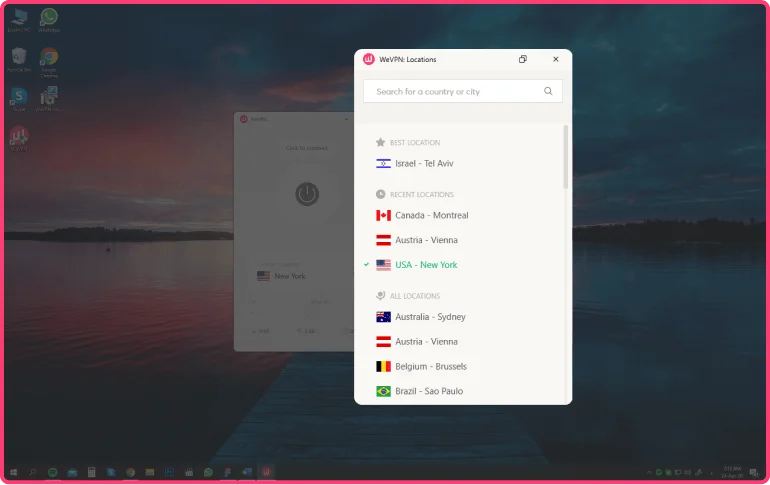
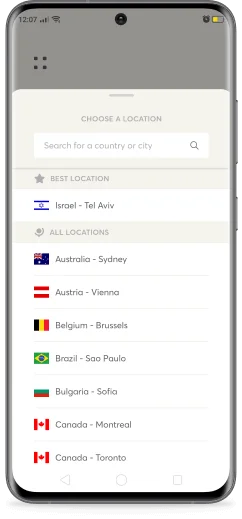
How to connect to a different VPN server location:
-
1
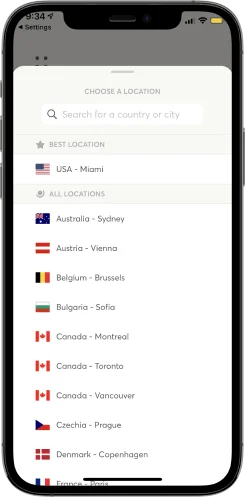
You may also select which server location you’d like to connect to.
Simply click the location picker on the welcome screen.
-
2
Click on the country you’d like to be automatically connected to.
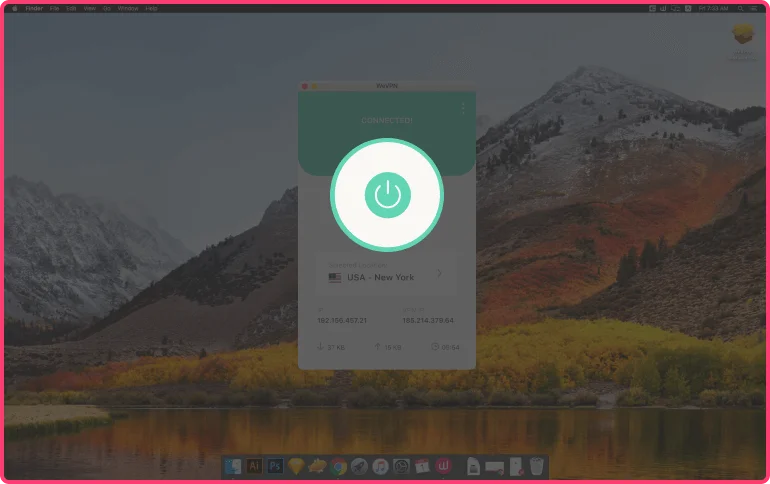
Disconnect from the VPN:
-
1
To disconnect the WeVPN app, simply click the ON button while the VPN is connected.
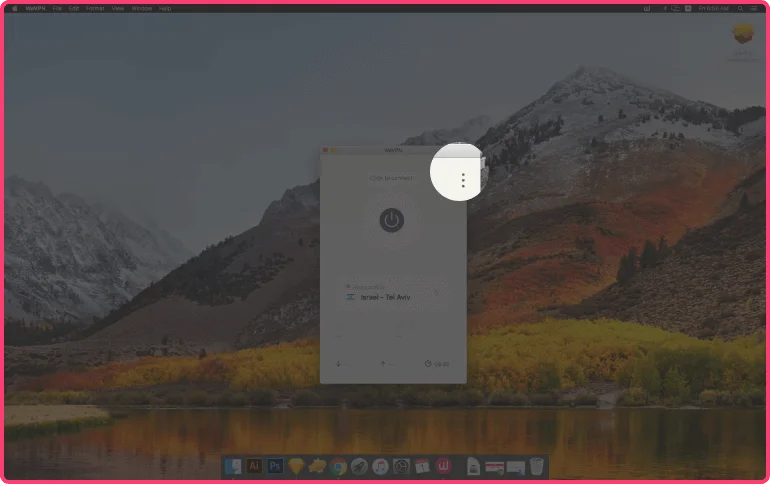
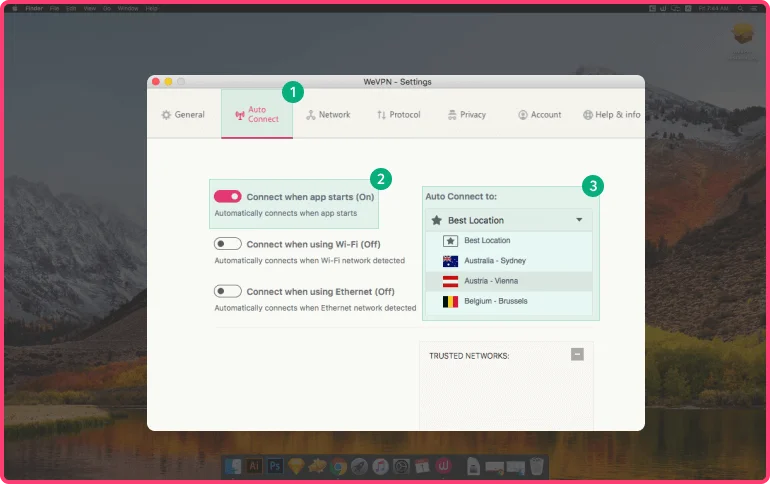
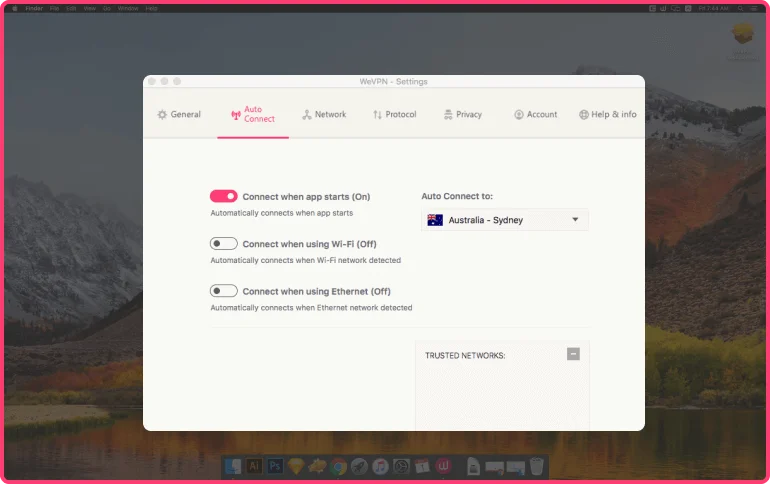
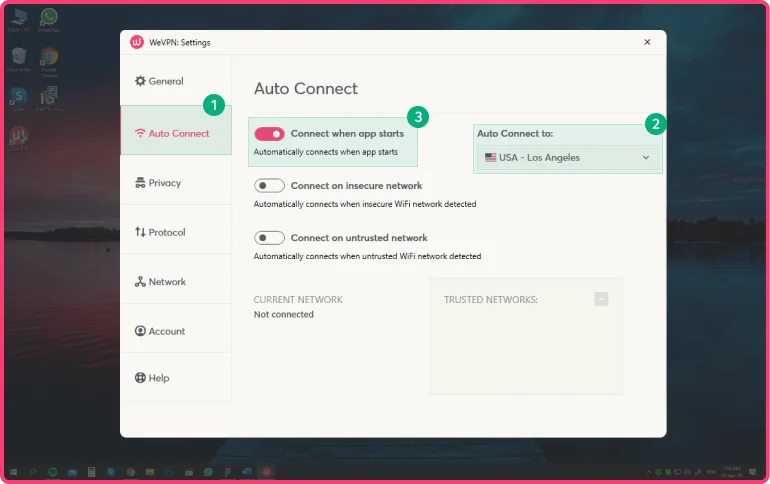
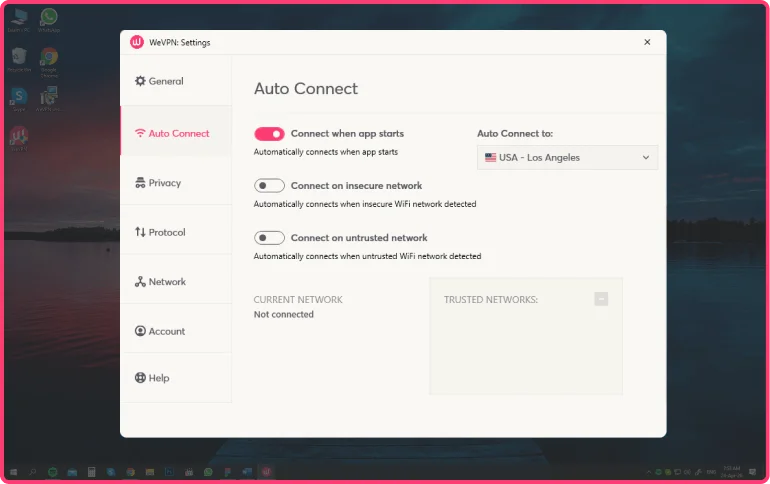
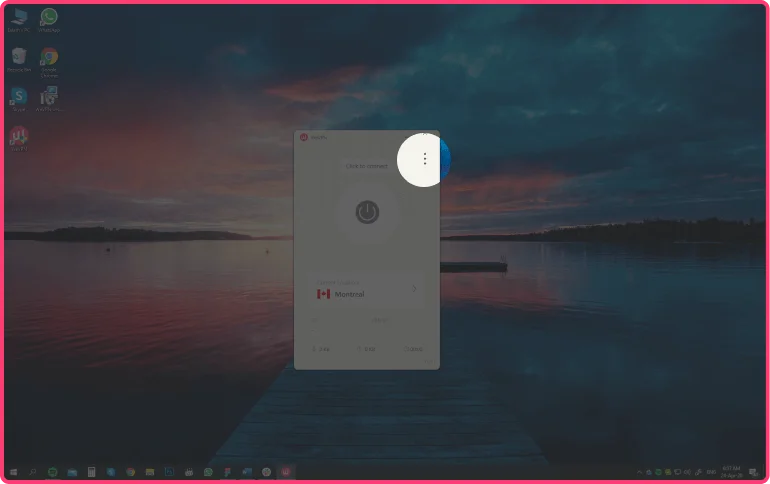
Auto Connect Feature
-
1
On the main WeVPN screen, click the menu icon
-
2
When the auto-connect feature is enabled, WeVPN will automatically connect you to one of our secure server locations every time you connect to a Wi-Fi or Ethernet network. You can also to choose for WeVPN to connect only when the app starts.
-
3
When enabling Auto-Connect on Wi-Fi networks, you can disable it on trusted networks such as your home Wi-Fi. To do this, click ‘Connect when using Wi-Fi’. The Wi-Fi network you are currently connected to will appear. Click the ‘Trust’ button to add it to your list of trusted Wi-Fi networks.
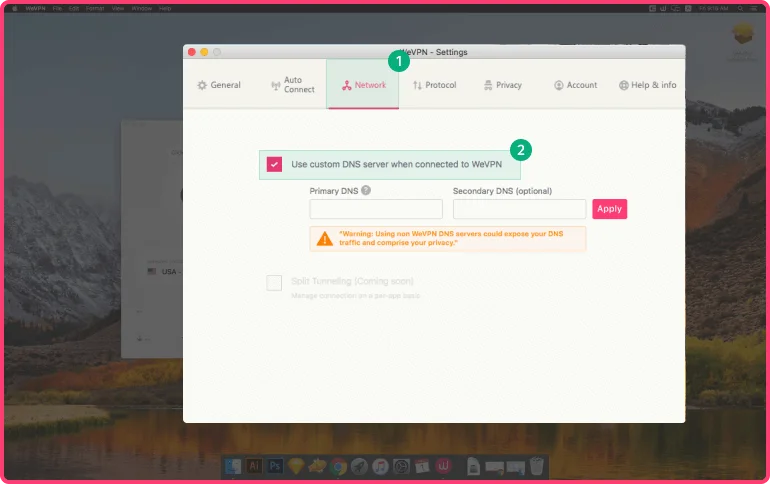
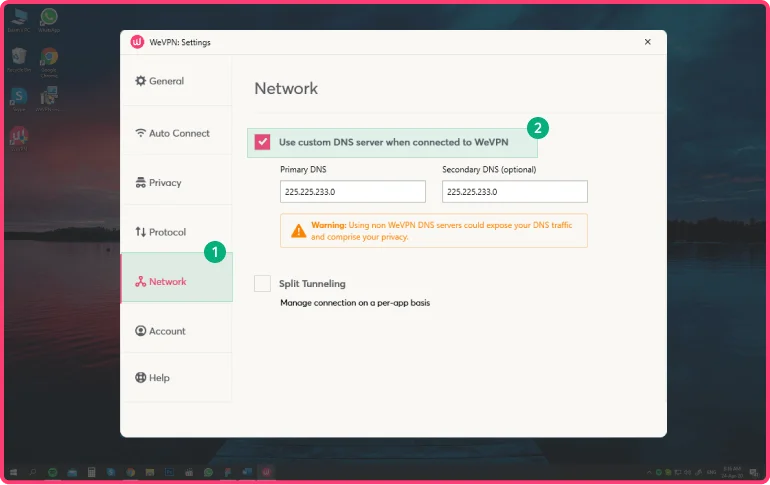
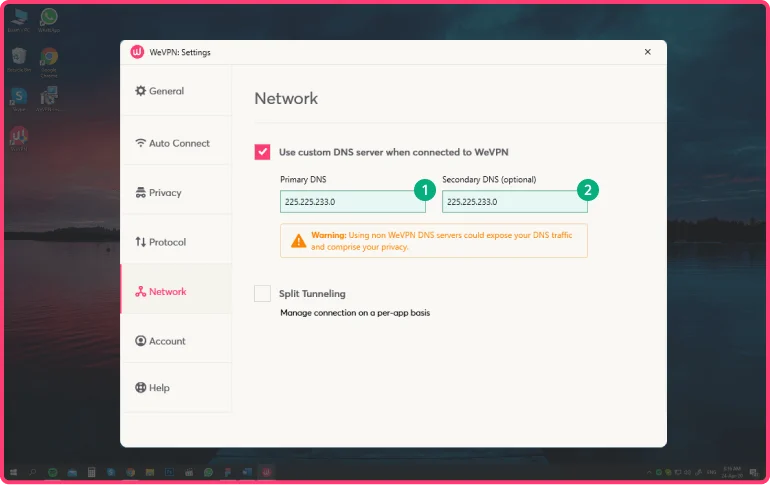
How to change your DNS servers on macOS
-
1
On the main WeVPN screen, click the menu icon
-
2
Click ‘Settings’, a screen will open.
-
3
Select the ‘Network’ tab and click ‘Use custom DNS server when connected to WeVPN’
-
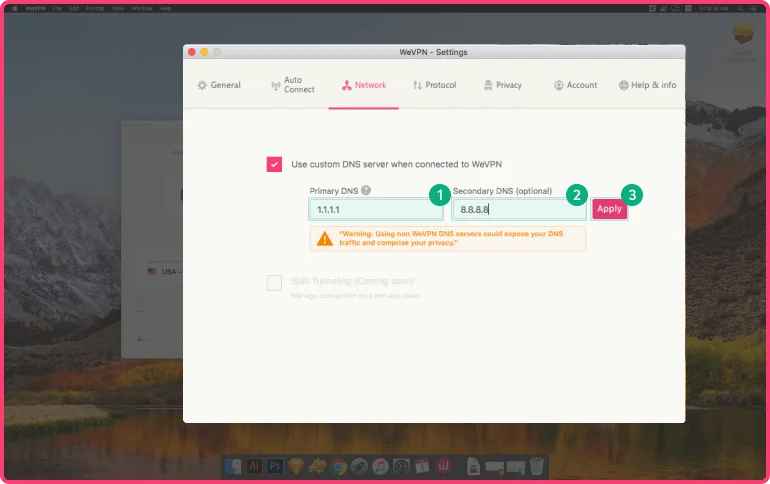
4
Enter you DNS server IPs in the ‘Primary DNS’ field and in the ‘Secondary DNS’ field (optional). Then click Apply
Warning: Using non WeVPN DNS servers could expose your DNS traffic and compromise your privacy.
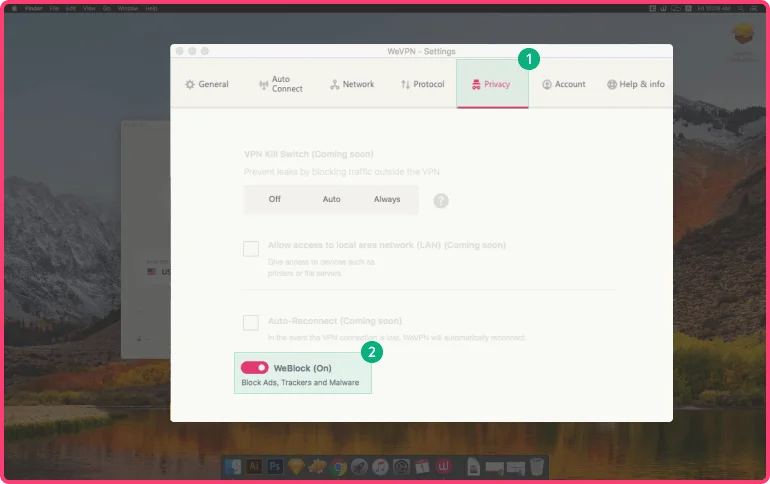
How to use WeBlock (Block ads, trackers and malware using our powerful WeBlock feature.)
-
1
On the main WeVPN screen, click the menu icon
-
2
Click ‘Settings’, a screen will open.
-
3
Select the Privacy tab and turn on WeBlock at the bottom of the screen.
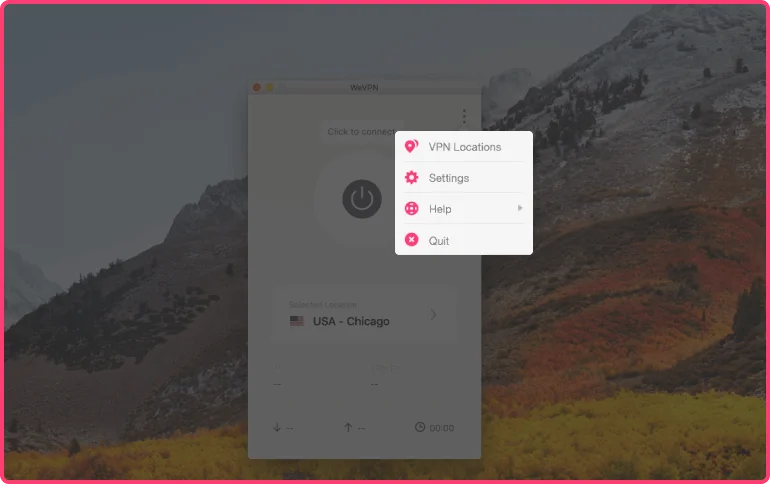
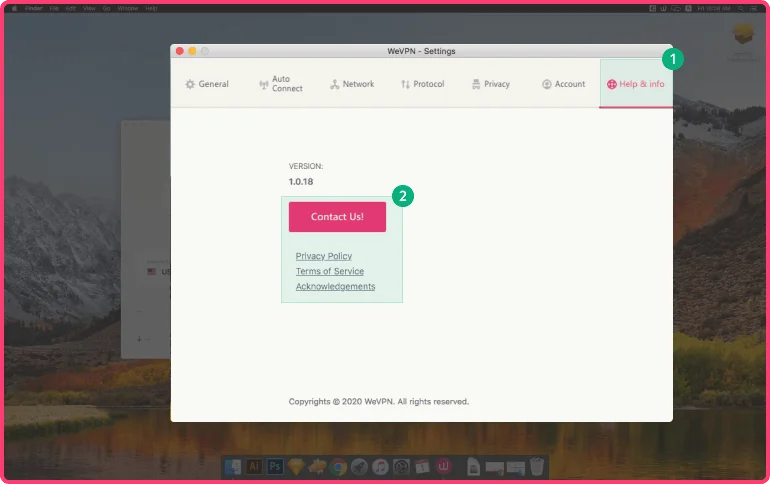
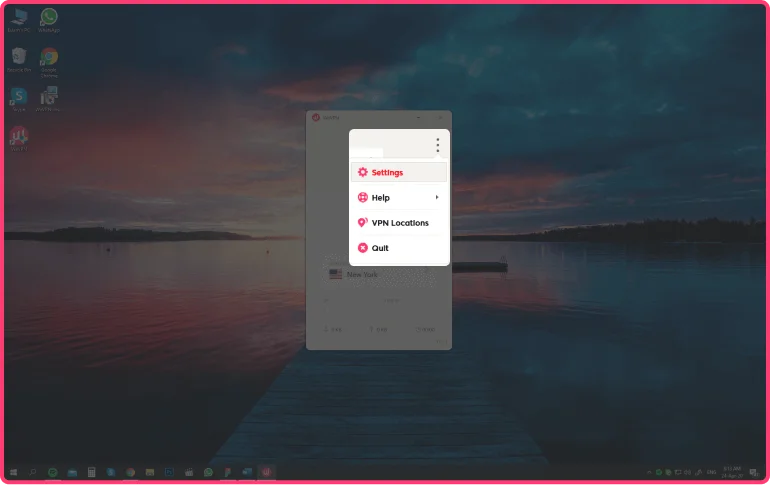
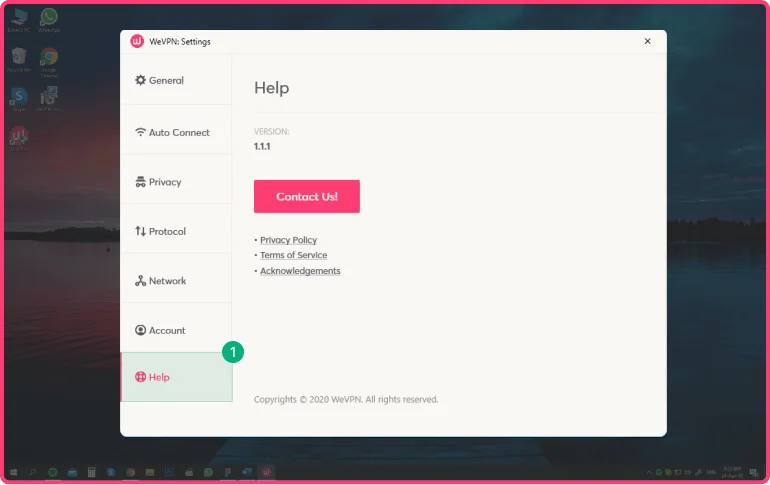
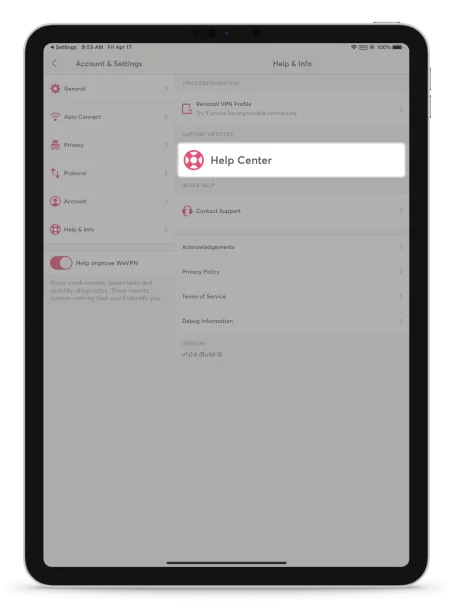
Help Center or Contact Support in the app
-
1
You may access the Help Center or Contact Support within the WeVPN app. On the main WeVPN screen, click the menu icon
-
2
Click ‘Settings’, a screen will open.
-
3
Select ‘Help’. Click the option that suits you best.
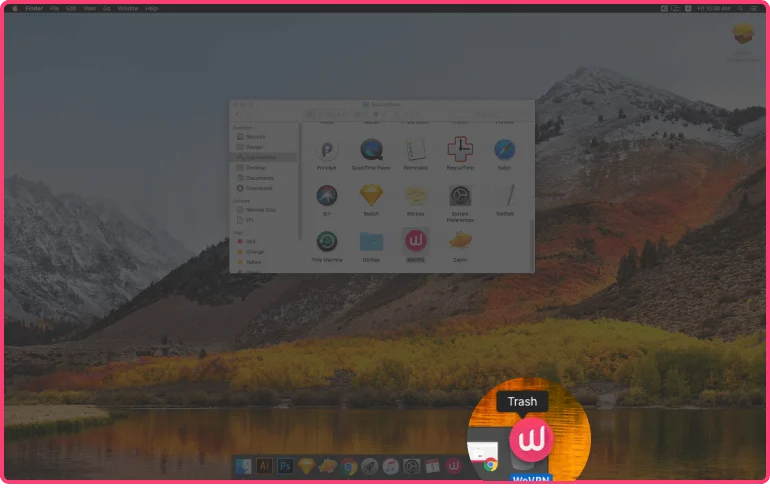
How to remove the WeVPN app from your Mac device
-
1
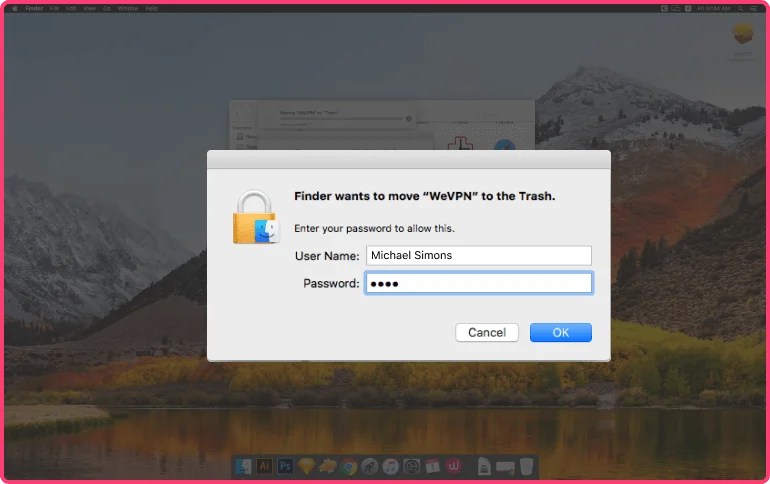
To remove WeVPN from your Mac device, locate the WeVPN app from your applications folder. Click and drag the app to the trash.
-
2
Before the app is uninstalled, you will be asked to enter your device password or to use Touch ID.
-
3
Once done, WeVPN will be removed from your computer.
Download the WeVPN App
Contents
-
01.
Download the WeVPN App
-
02.
Setup the WeVPN App
-
03.
Connect to one of our 66 VPN server locations
-
04.
How to connect to a different VPN server location
-
05.
Disconnect from the VPN
-
06.
Auto Connect Feature
-
07.
How to change your DNS servers on Windows
-
08.
How to use WeBlock
-
09.
Help Center or Contact Support in the app
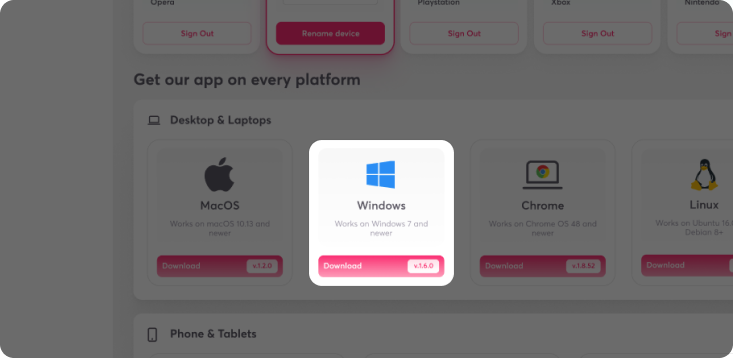
How to set up WeVPN on Windows 7, 8, 10
This tutorial will show you how to download and install WeVPN for Windows on your PC or laptop.
This App requires the following Windows System:
-
Windows 7 (64-bit only)
-
Windows 8.1 (64-bit only)
-
Windows 10 (64-bit only)
Step 01
Download the WeVPN App
-
1
Click here to go to our “Get started page”
-
2
Select a plan. WeVPN offers a 30-day money-guarantee.
-
3
Enter a valid email and create a strong password.
-
4
Select a payment method and fill out your billing and contact information.
-
5
if you have, enter the coupon code then click the apply button
-
6
Next, you will be redirected to your dashboard.
-
7
Click the ‘Download’ button. The download will start automatically.
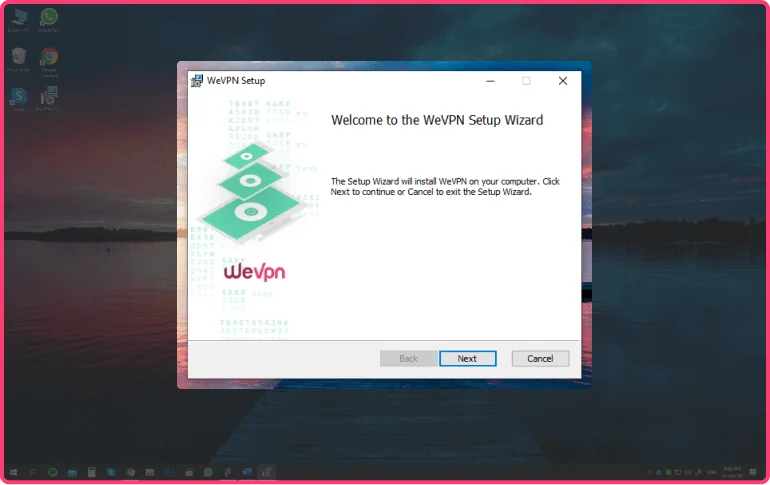
Step 02
Setup the WeVPN App
-
1
Locate and double-click the WeVPN download file on your computer
-
2
If you see a prompt to install the app, click Next to continue.
-
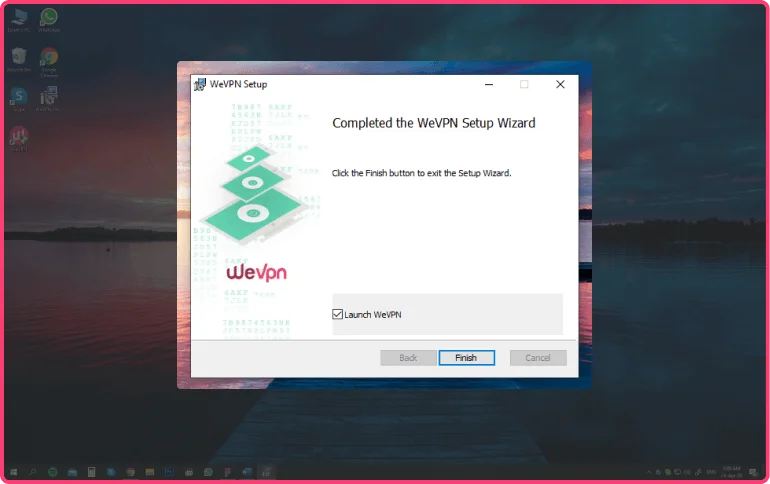
3
Please wait while the app is being installed. Then click Finish.
-
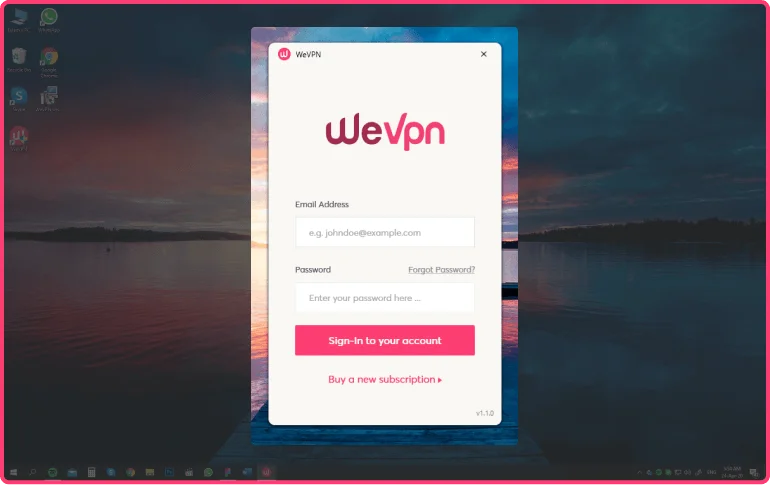
4
When prompted, click Sign-in to your account and use the credentials you created earlier.

Step 03
Connect to one of our VPN server locations
-
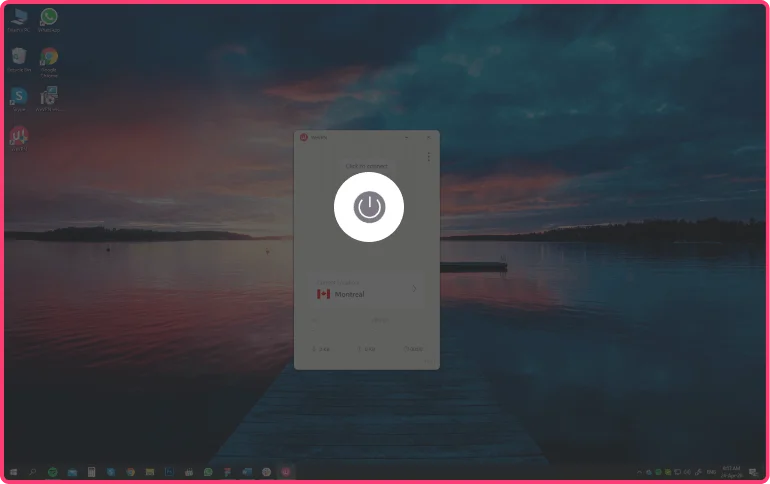
1
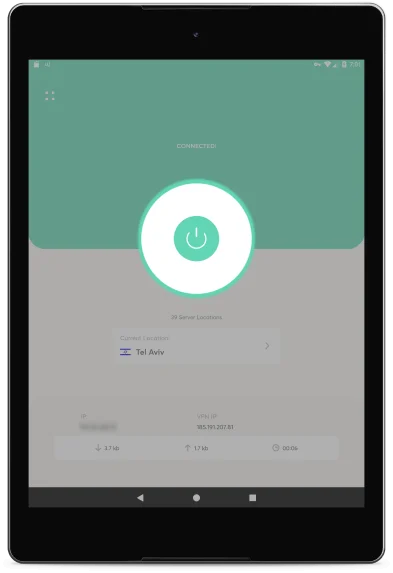
To automatically connect to a VPN server location, click the ON button. By default, our smart algorithm will connect you to the optimal server (based on your location, needs and preferences).
-
2
Once the app is connected, you can start enjoying a fast, secure & unrestricted internet connection!

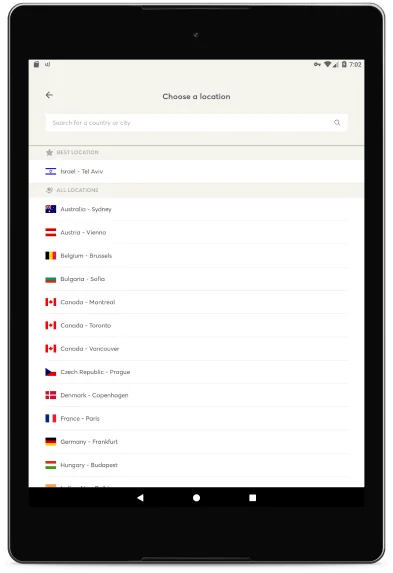
How to connect to a different VPN server location:
-
1
You may also select which server location you’d like to connect to. Simply click the location picker on the welcome screen.
-
2
Click on the country you want to be automatically connected to the server.
Disconnect from the VPN server location
-
1
To disconnect the WeVPN app, simply click the ON button while the VPN is connected.
Auto Connect Feature
-
1
On the main WeVPN screen, click the menu icon
-
2
When the auto-connect feature is enabled, WeVPN will automatically connect you to one of our secure server locations automatically every time you either connect to a Wi-Fi or Ethernet network. You can also to choose for WeVPN to connect only when the app starts.
-
3
When enabling Auto-Connect on Wi-Fi networks, you can disable it on trusted networks such as your home Wi-Fi. To do this, click ‘Connect when using Wi-Fi’. The Wi-Fi network you are currently connected to will appear. Click the ‘Trust’ button to add it to your list of trusted Wi-Fi networks.

How to change your DNS servers on Windows
-
1
On the main WeVPN screen, click the menu icon
-
2
Click ‘Settings’, a screen will open.
-
3
Select the ‘Network’ tab and click ‘Use custom DNS server when connected to WeVPN’
-
4
Enter you DNS server IPs in the ‘Primary DNS’ field and in the ‘Secondary DNS’ field (optional).
Warning: Using non WeVPN DNS servers could expose your DNS traffic and compromise your privacy.


How to use WeBlock (Block ads, trackers and malware using our powerful WeBlock feature.)
-
1
On the main WeVPN screen, click the menu icon
-
2
Click ‘Settings’, a screen will open.
-
3
Select the Privacy tab and turn on WeBlock at the bottom of the screen.

Help Center or Contact Support in the app
-
1
You may access the Help Center or Contact Support within the WeVPN app. On the main WeVPN screen, click the menu icon
-
2
Click ‘Settings’, a screen will open.
-
3
Select ‘Help’. Click the option that suits you best.
Download the WeVPN App
Contents
-
01.
Download the WeVPN App
-
02.
Setup the WeVPN App
-
03.
Connect to one of our 66 VPN server locations
-
04.
How to connect to a different VPN server location
-
05.
Disconnect from the VPN
-
06.
Auto Connect Feature
-
07.
Help Center or Contact Support in the app
-
08.
How to remove the WeVPN app from your iOS device
How to set up WeVPN on iOS: iPhone, iPad
This tutorial will show you how to download and install WeVPN on your iPhone and iPad for iOS 11 and above.
Step 01
Download WeVPN in the app store
-
1
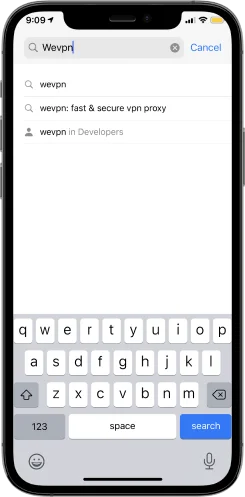
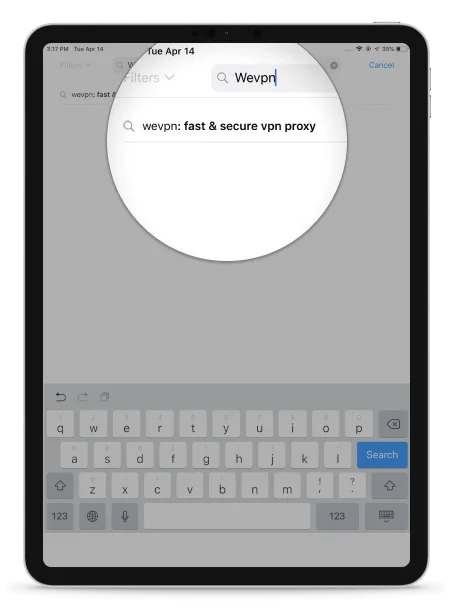
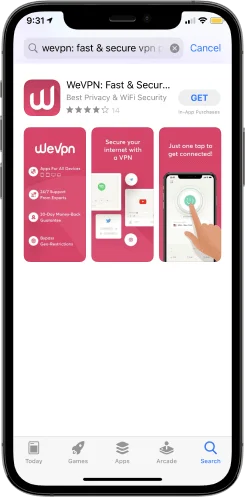
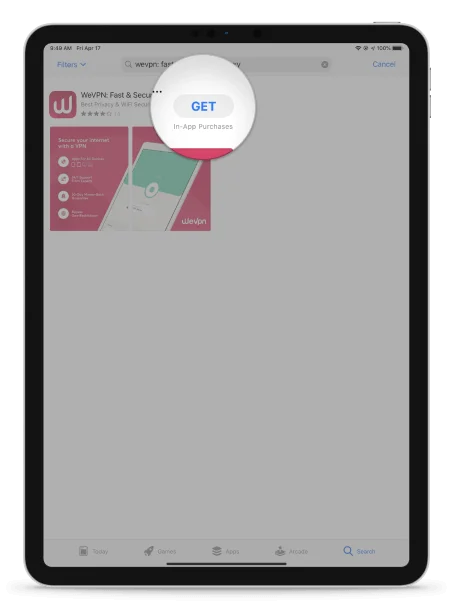
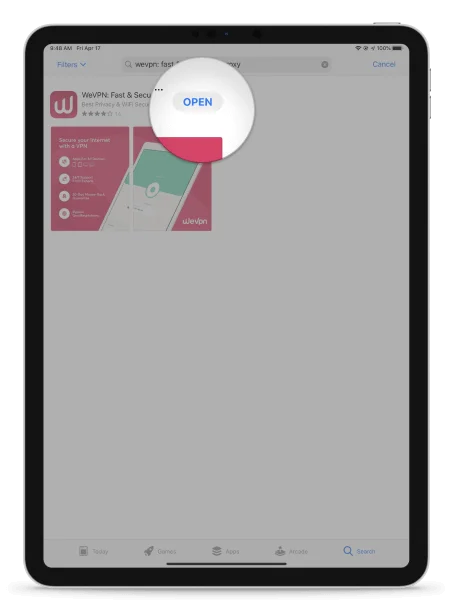
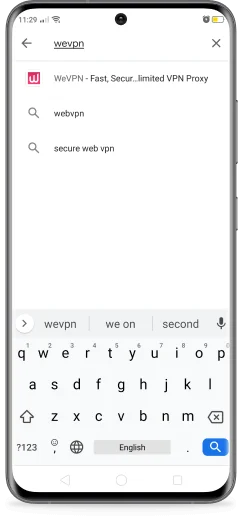
Go to the App Store and search for WeVPN.
-
2
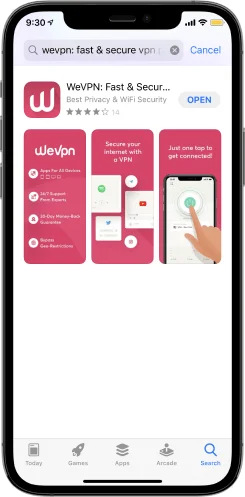
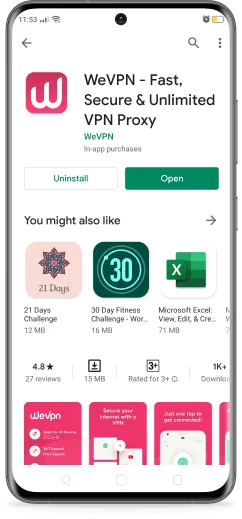
Tap get and the download will start automatically.
-
3
After the app finishes downloading, tap open to launch WeVPN.
Step 02
Setup the WeVPN app
-
1
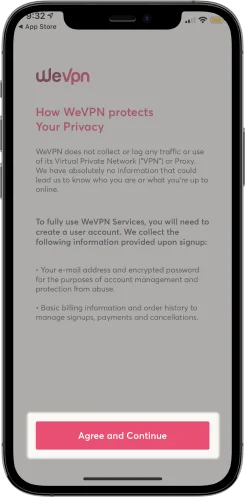
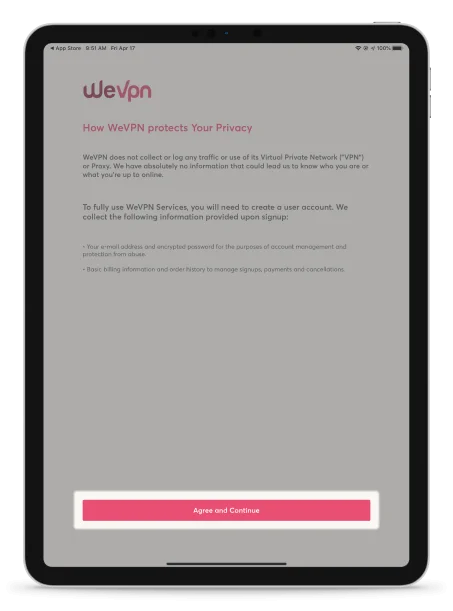
First, you will see a statement detailing the information collected by the WeVPN app. Tap Agree and Continue.
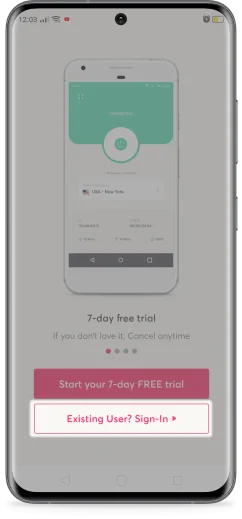
-
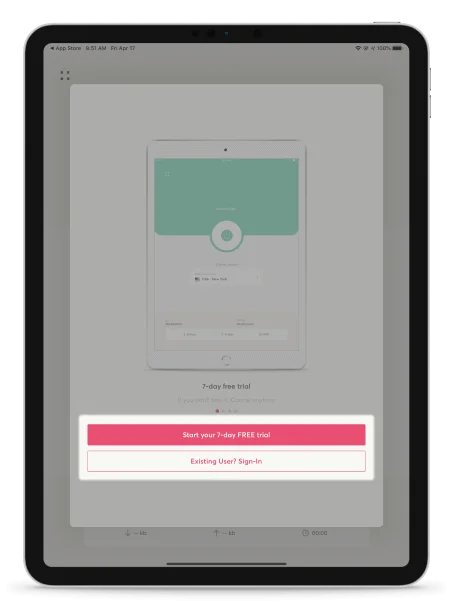
2
On the app’s welcome screen, tap Existing User? Sign In. If you do not have an account yet, tap Start your 7-day FREE trial and follow on-screen instructions.
-
3
Use the credentials associated with your WeVPN account or set up a new account by tapping Start your 7-day FREE trial
-
4
You are now ready to set up your VPN. Tap Continue to start the installation.
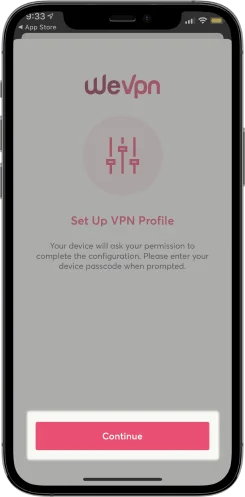
-
5
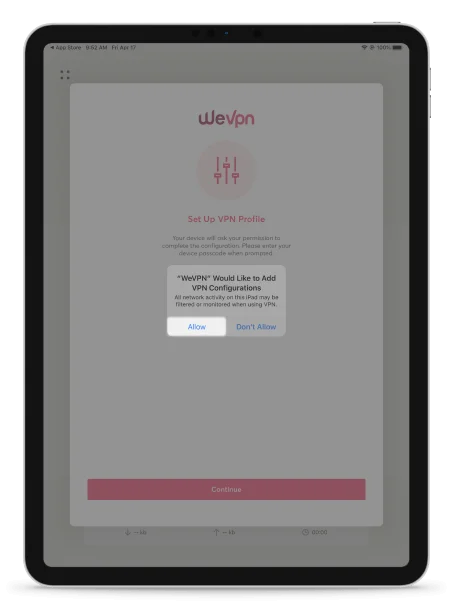
When connecting for the first time, you will be asked to allow WeVPN to add VPN configurations. Tap Allow.
-
6
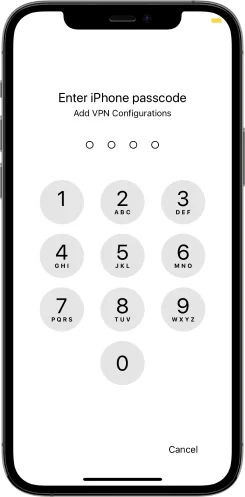
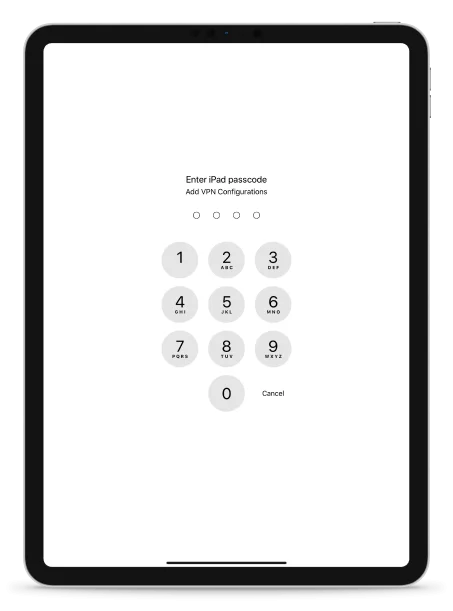
Enter your passcode or use Touch ID to add the VPN configurations.
-
7
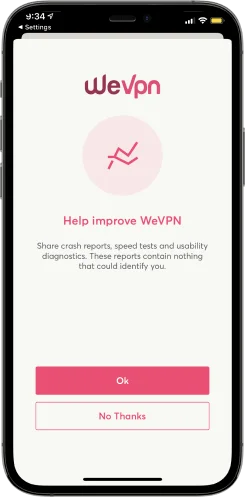
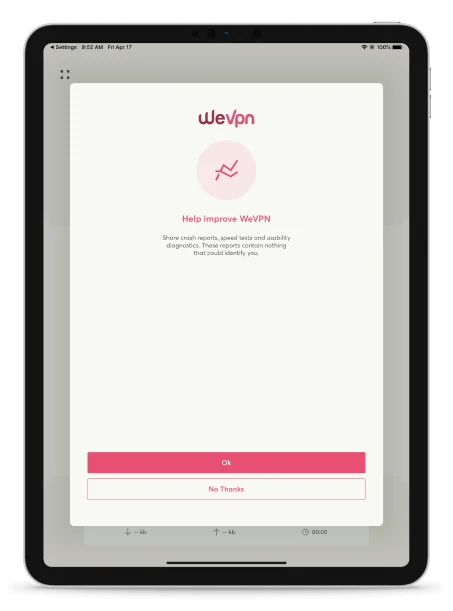
You will then be asked if you’d like to share crash reports, speeds tests and usability diagnostics to help improve the WeVPN app. Select your preference to continue.


Step 03
Connect to one of our VPN server locations
-
1
To automatically connect to a VPN server location, tap the ON button. By default, our smart algorithm will connect you to the optimal server (based on your location, needs and preferences).
-
2
Once the app is connected, you can start enjoying a fast, secure & unrestricted internet connection!
How to connect to a different VPN server location:
-
1
You may also select which server location you’d like to connect to. Simply tap the location picker on the welcome screen.
-
2
Tap on the country you want to be automatically connected to the server.


Disconnect from the VPN
-
1
To disconnect the WeVPN app, simply tap the ON button while the VPN is connected.
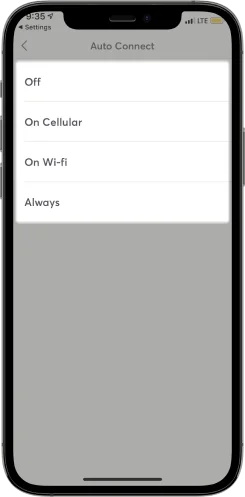
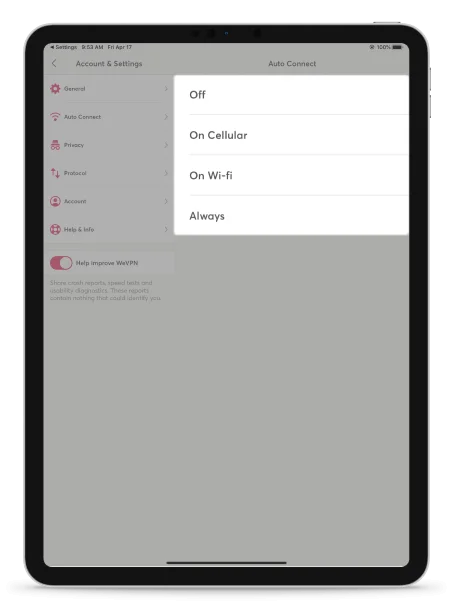
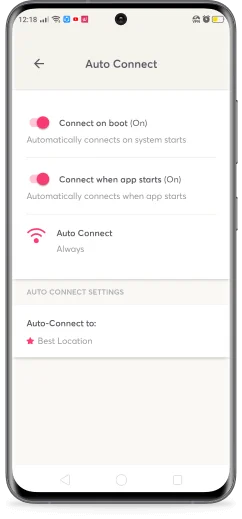
Auto Connect Feature
-
1
On the main WeVPN screen, tap the menu icon
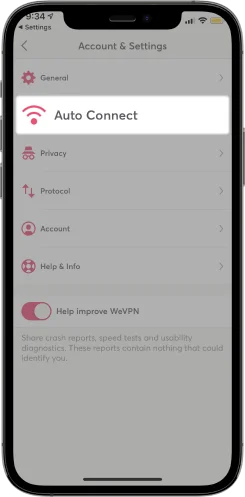
-
2
Next, tap Auto Connect
-
3
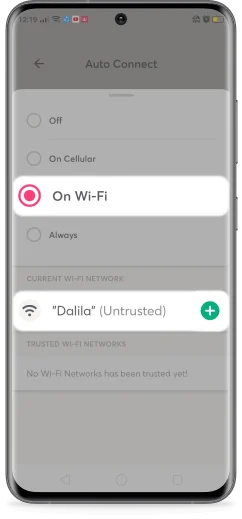
When the auto-connect feature is enabled, WeVPN will automatically connect you to one of our secure server locations automatically every time you either connect to a Wi-Fi network, to a Cellular network, or any time the WeVPN app is launched (Always).
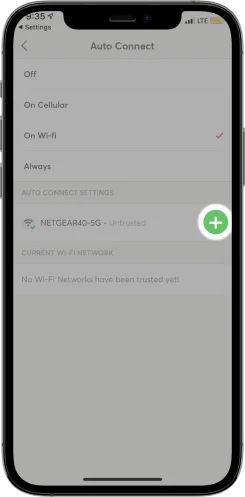
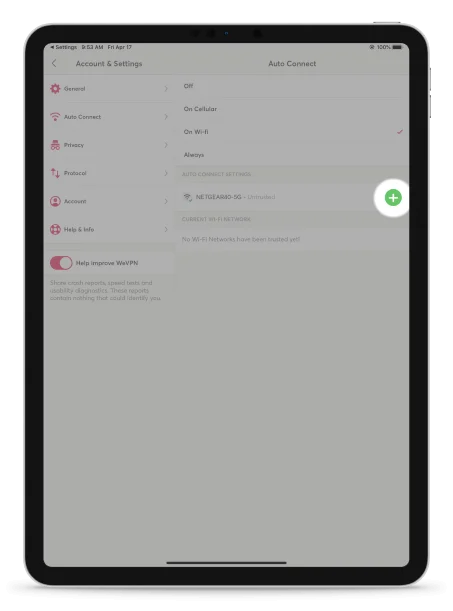
-
4
When enabling Auto-Connect on Wi-Fi networks, you can disable it on trusted networks such as your home Wi-Fi. To do this, tap On Wi-Fi. The Wi-Fi network you are currently connected to will appear. Tap the plus icon to add it to your list of trusted Wi-Fi networks.

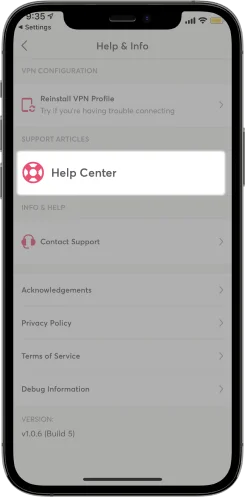
Help Center or Contact Support in the app
-
•
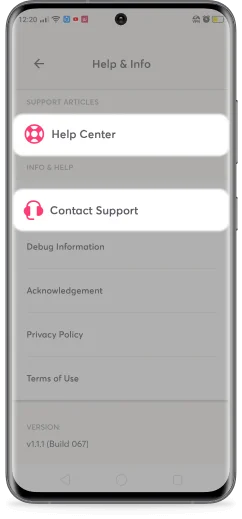
You may access the Help Center or Contact Support within the WeVPN app. Simply tap the menu icon then select Help & Info.
How to remove the WeVPN app from your device
-
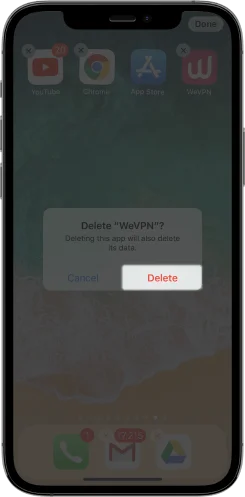
1
To remove WeVPN from iPhone or iPad, tap and hold the WeVPN icon app-icon until it vibrates. Tap Delete. The app is now deleted. To reinstall it, please look for WeVPN in the App Store.
Download the WeVPN App
Contents
-
01.
Download the WeVPN App
-
02.
Setup the WeVPN App
-
03.
Connect to one of our 66 VPN server locations
-
04.
How to connect to a different VPN server location
-
05.
Disconnect from the VPN
-
06.
How to use the Kill Switch feature
-
07.
How the use the ‘Aggressive IPv6 Blocking’ feature
-
08.
How to use the custom DNS feature on Android
-
09.
How to use the Split Tunneling feature
-
10.
Auto Connect Feature
-
11.
Help Center or Contact Support in the app
-
12.
How to remove the WeVPN app from your android device
How to set up WeVPN on Android 4.4 and above
This tutorial will show you how to download and install the WeVPN Android app.
Step 01
Download WeVPN in the Google Play Store
-
1
Go to the Google Play store and search for WeVPN.
-
2
Tap Install. The download will start automatically. Then tap Open.
Step 02
Setup the WeVPN app
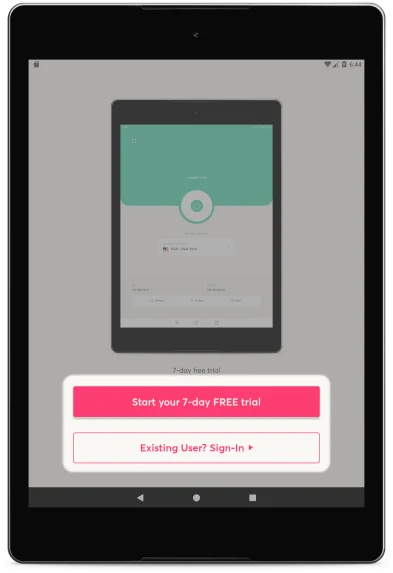
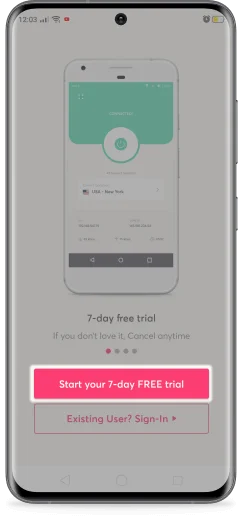
-
1
On the app’s welcome screen, tap Existing User? Sign In.
-
2
If you do not have an account yet, tap Start your 7-day FREE trial and follow on-screen instructions.
-
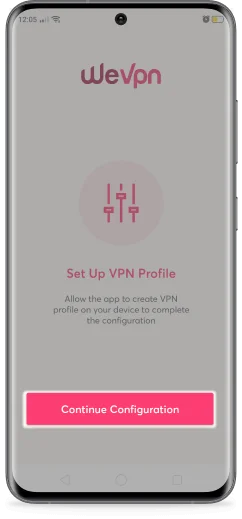
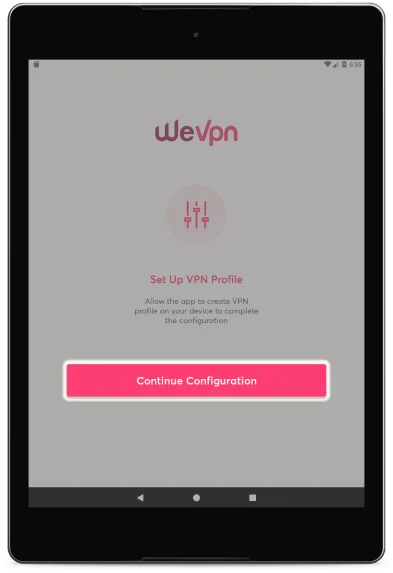
3
You are now ready to set up your VPN. Tap Continue Configuration to start the installation.
-
4
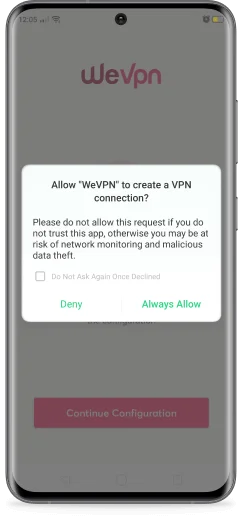
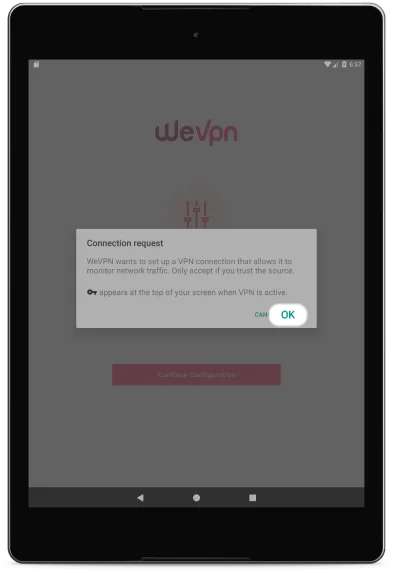
You will be prompted to set up your VPN and approve connection requests by WeVPN. Tap OK to continue.
-
5
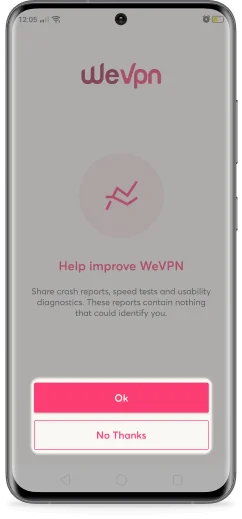
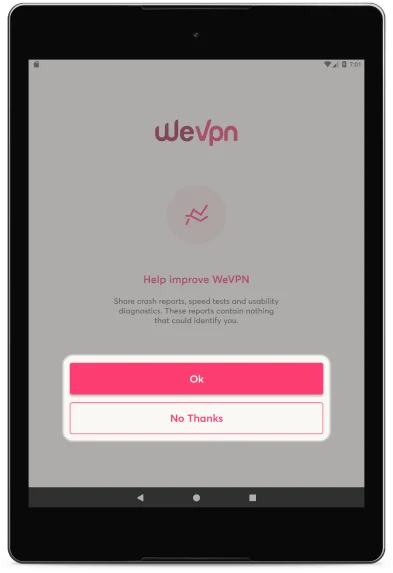
You will then be asked if you’d like to share crash reports, speeds tests and usability diagnostics to help improve the WeVPN app. Select your preference to continue

Step 03
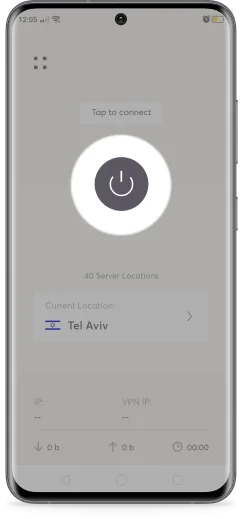
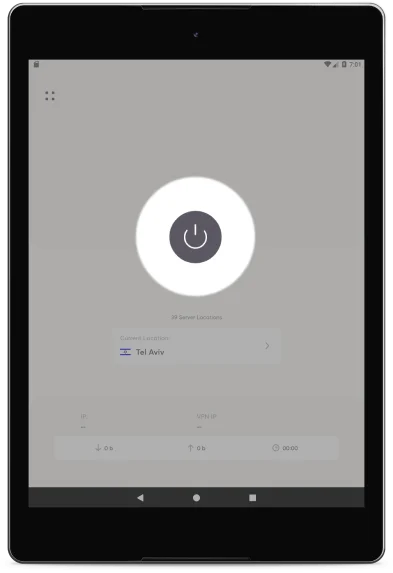
Connect to one of our VPN server locations
-
1
To automatically connect to a VPN server location, tap the ON button. By default, our smart algorithm will connect you to the optimal server (based on your location, needs and preferences).
-
2
Once the app is connected, you can start enjoying a fast, secure & unrestricted internet connection!


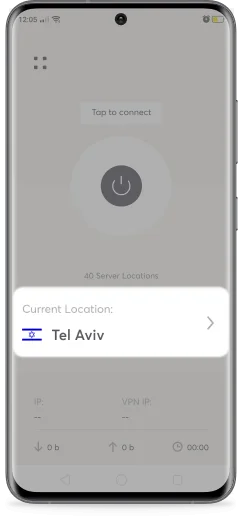
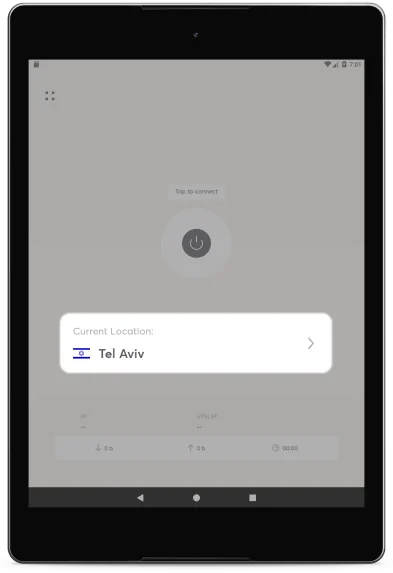
How to connect to a different VPN server location:
-
1
You may also select which server location you’d like to connect to. Simply tap the location picker on the welcome screen.
-
2
Tap on the country you want to be automatically connected to
Disconnect from the VPN server location
-
1
To disconnect the WeVPN app, simply tap the ON button while the VPN is connected.
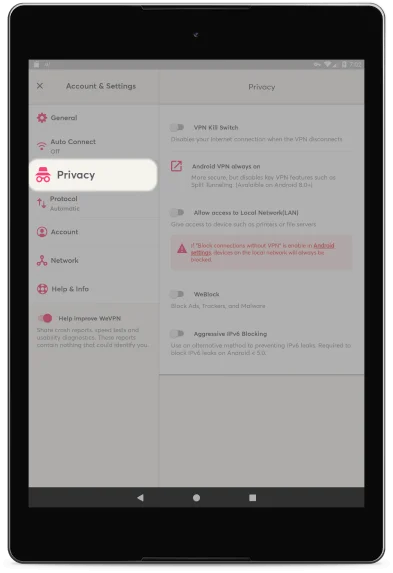
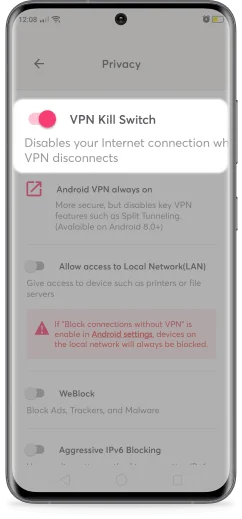
How to use the Kill Switch feature
-
1
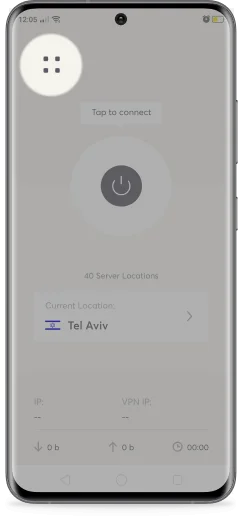
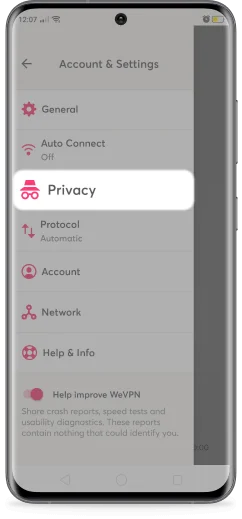
To turn On the VPN Kill Switch, tap the main menu icon on the WeVPN welcome screen
WeVPN Kill Switch prevents your activities and sensitive data from being exposed in the case that your VPN connection drops unexpectedly. This will ensure that your internet connection is protected at all times.
-
2
Tap Privacy
-
3
Then toggle the VPN Kill Switch on.
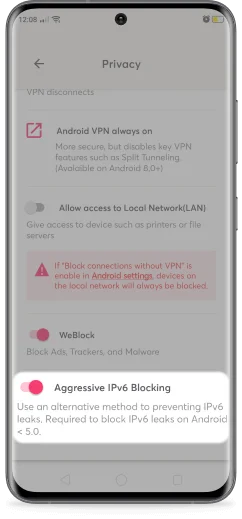
How the use the ‘Aggressive IPv6 Blocking’ feature
-
1
On the welcome screen, tap the main menu icon
Use an alternative method to preventing IPv6 leaks. Required to block IPv6 leaks on Android < 5.0.
-
2
Tap Privacy
-
3
Toggle Aggressive IPv6 Blocking on.
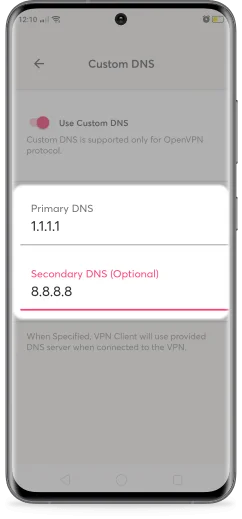
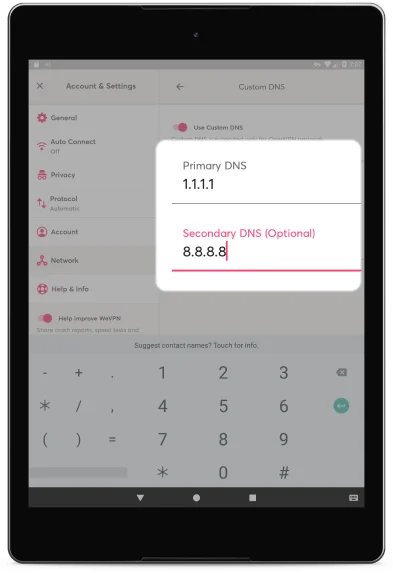
How to use the custom DNS feature on Android
-
1
On the welcome screen, tap the main menu icon
-
2
Tap ‘Network’. Then tap ‘Custom DNS’
-
3
Enter you DNS server IPs in the ‘Primary DNS’ field and in the ‘Secondary DNS’ field (optional).
Warning: Using non WeVPN DNS servers could expose your DNS traffic and compromise your privacy.
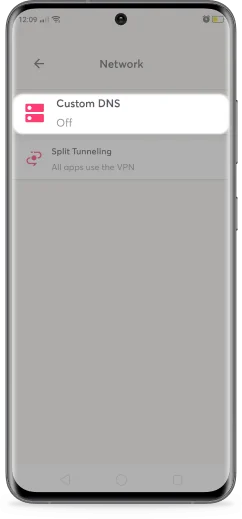
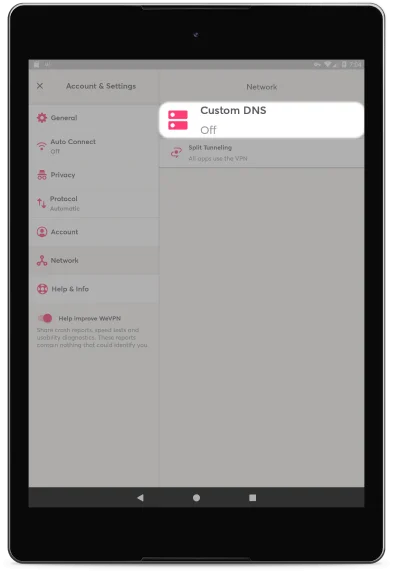
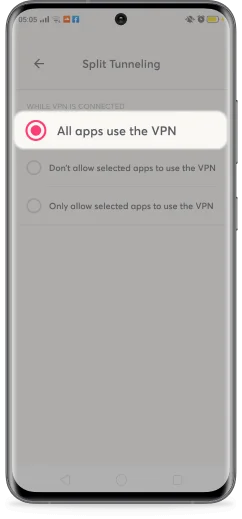
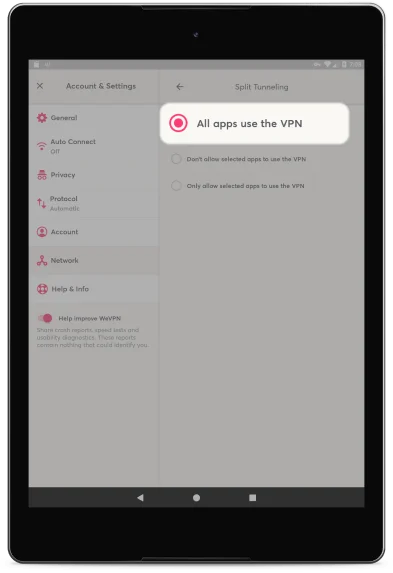
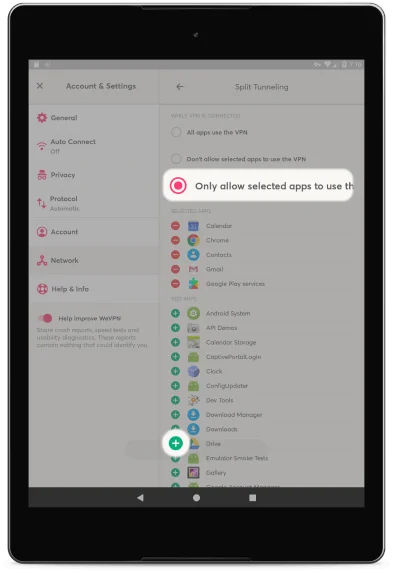
How to use the Split Tunneling feature
-
1
To access your split-tunneling settings, tap the main menu icon on the WeVPN welcome screen.
The purpose of the Split Tunneling feature is to allow customers to only send traffic from certain applications through the VPN tunnel when connected to WeVPN.
-
2
Tap ‘Network’. Then tap ‘Split Tunneling’. By default, all apps use the VPN.
-
3
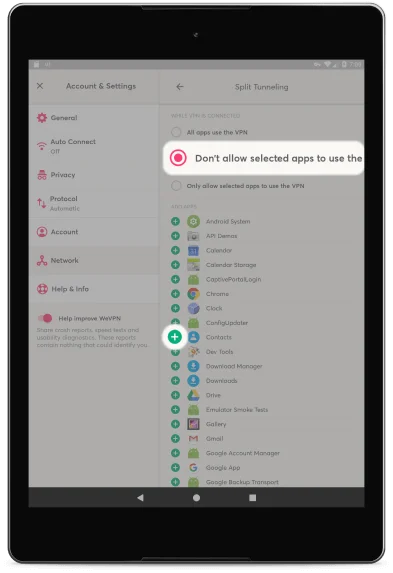
To restrict some apps from using the VPN tunnel, tap ‘Don’t allow selected apps to use the VPN’. Then tap the sign to restrict the app from using the VPN tunnel.
-
4
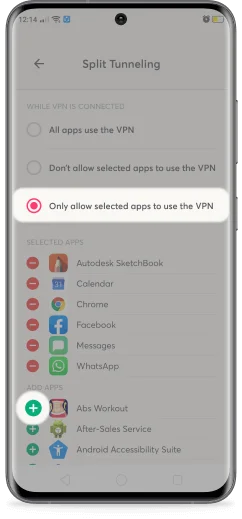
To only allow certain apps to use the VPN tunnel, tap ‘Only allow selected apps to use the VPN’. Then tap the sign to select the apps you want to apply VPN protection to.

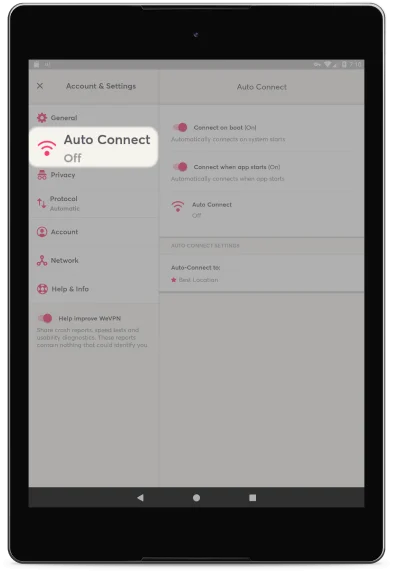
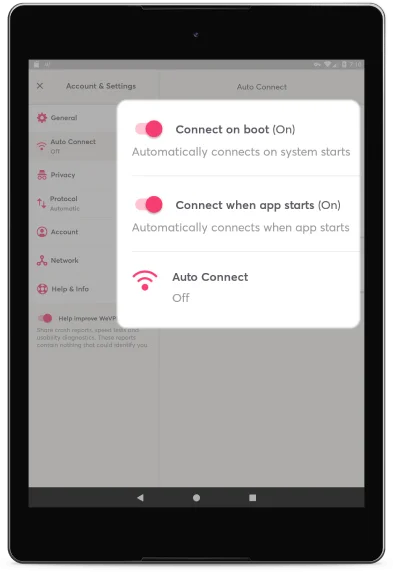
Auto Connect Feature
-
1
On the main WeVPN screen, tap the menu icon
-
2
Next, tap Auto Connect
-
3
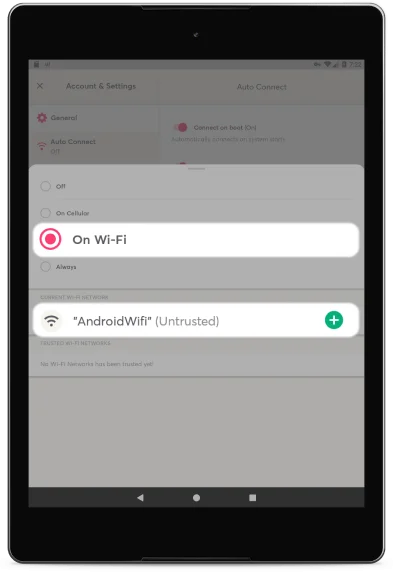
When the auto-connect feature is enabled, WeVPN will automatically connect you to one of our secure server locations automatically every time you either connect to a Wi-Fi network or to a Cellular network. You may also choose to auto-connect when your device is turned on (Connect on boot) or when you start the app (Connect when app starts)
-
4
When enabling Auto-Connect on Wi-Fi networks, you can disable it on trusted networks such as your home Wi-Fi. To do this, tap On Wi-Fi. The Wi-Fi network you are currently connected to will appear. Tap the sign to add it to your list of trusted Wi-Fi networks.

Help Center or Contact Support in the app
-
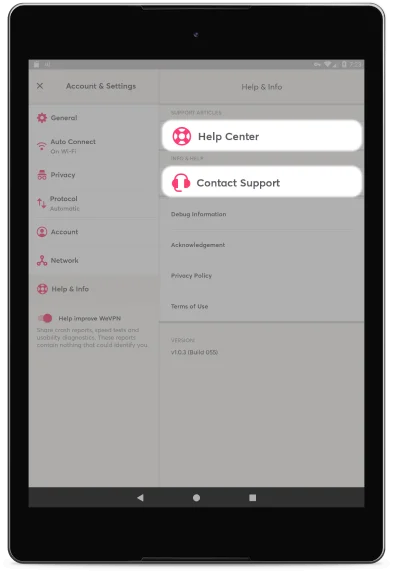
1
You may access the Help Center or Contact Support within the WeVPN app. Simply tap the menu icon, then select Help & Info.
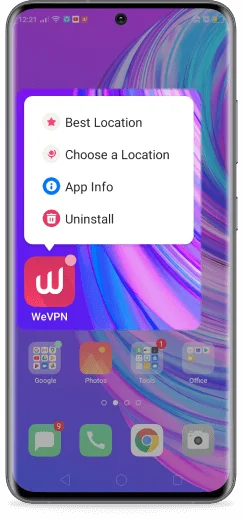
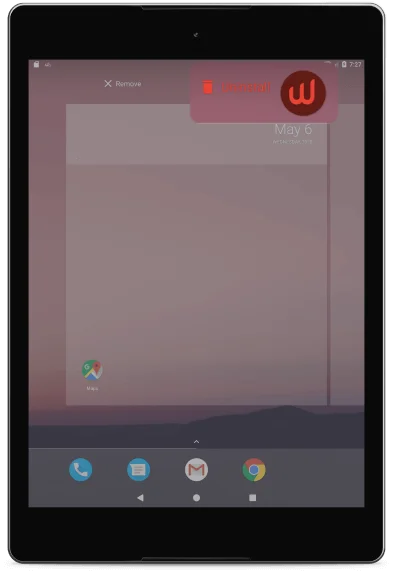
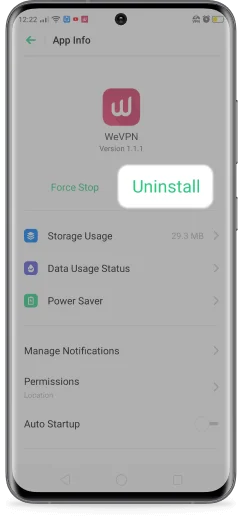
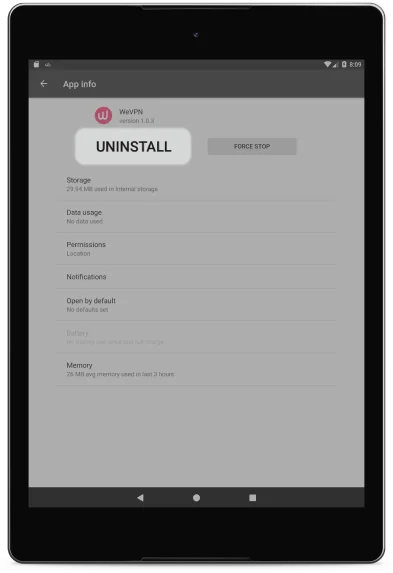
How to remove the WeVPN app from your android device
-
1
To remove WeVPN from your Android device, tap and hold the WeVPN icon until it vibrates. Tap the Info icon. Tap Uninstall.
-
2
To remove WeVPN from your Android device, tap and hold the WeVPN icon until it vibrates. Tap the Info icon. Tap Uninstall.